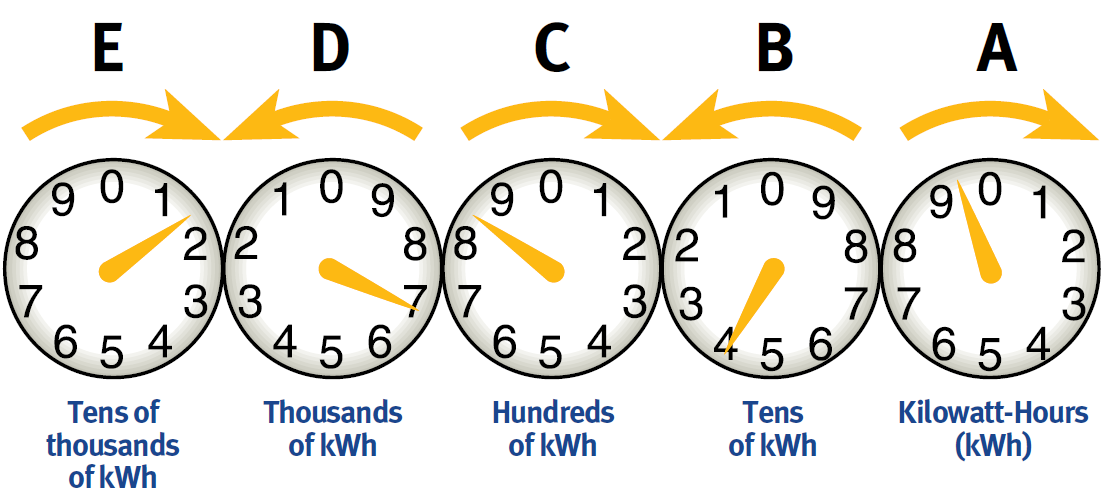
Electro-Mechanical Meter With Dials
This meter type is being phased out and is no longer available for installation.
To read the meter:
- Stand directly in front of the meter so you can clearly see the location of each pointer.
- Read the dials from right to left (see below), and write the numbers down from right to left (see handy form, below).
- When the hand on any dial is between two numbers, read the smaller number.
- If the pointer appears to be exactly on a number, record the next lowest number unless the pointer on the dial to its right is between zero and one.

Step-by-step example:
- DIAL A: The pointer between 9 and 0. Record the smaller number which is 9.
- DIAL B: The pointer looks like it is right on 4, but the dial to its right has not passed zero. You record this dial as 3.
- DIAL C: The dial is between 8 and 9. Record the smaller number which is 8.
- DIAL D: The dial is between 6 and 7. Record the smaller number which is 6.
- DIAL E: The pointer is between 1 and 2. Record the smaller number which is 1.
In this example, the reading is 16839. Once you have written down the reads, you say them as any other number, from left to right. For the example below you would say “1 – 6 – 8 – 3 – 9”.
Here is a handy form to use when collecting the reads to provide to UI:
| DIAL / Reading Order |
DIAL E / |
DIAL D / |
DIAL C / |
DIAL B / |
DIAL A / |
| Reading |
